Gaming Innovation Group (GIG) Endeavour Promotions Engine
Add GIG promotions to your Xtremepush campaigns to send promotions to your users and track them
Syncing your GIG promotions with Xtremepush allows you to send promotion campaigns and return details of who were sent a promotion back to GIG.
It is possible to assign different promotions to different variants via split test campaigns so that the effectiveness of different promotions can be assessed.
Customers can also use the multi-stage journey builder to create campaigns that assign different promotions at different stages of a campaign based on customer behaviour.
Create a connection to GIG
There are 3 different types of promotions you can use in your campaign from GIG: Bonuses, Free Bets and Free Spins. You can select each one you would like to use and connect to it in the Integrations Marketplace tab found at Settings > Integrations > Marketplace and click Connect and follow the instructions below for how to connect to the integration.
Basic settings
Give your connection a Name that helps you easily identify it.
Connection settings
Contact your GIG account manager to retrieve the connection details needed. You will need the OpenID Base URL, OpenID Client ID, OpenID Client Secret, OpenID Realm, OpenID Scope, Base URL and X-Tenant-ID.
Input your GIG connection settings and click Connect.
URL formatThe OpenID Base URL and Base URL value should be a full URL, starting with
https://and ending with a/slash.
More than one connection to GIG Bonus EngineIt is possible to have additional GIG Bonus Engine connections by repeating the integration steps outlined in the section above.
However, you should only have one active connection at any given time to avoid any potential clashes with sync processes.
Synchronise promotions
Sync from GIG to Xtremepush
Automated sync
An automated sync from GIG to Xtremepush runs as soon as the connection has been set up.
An hourly, automated sync runs going forward. Details can be found in the Overview page.
Manual sync
If you update your promotions within GIG and need to use them in a campaign before the next scheduled automated sync, it's possible to n run a manual sync.
In the Overview tab for your integration found at Settings > Integrations > Marketplace > Configured Integrations, click the Actions button. Select Sync action and click Start sync.
Check task status
When the sync process has started, you will be taken to the Task group page in the Task history, where you can see the status of the promotion synchronisation.
To check the sync task history go to Settings > Integrations > Marketplace > Configured Integrations and select your integration. On the Overview tab you will find a list of the Sync history showing the status of each sync task.
Sync from Xtremepush to GIG
The Xtremepush platform will return the GIG promotionID, user_id and amount back to GIG in real-time (once the campaign has been sent).
Download details from a completed sync
The Task details page provides information for the selected sync such as processed promotions, created promotions, updated promotions, deleted promotions and sync status.
Select the integration at Settings > Integrations > Marketplace > Configured Integrations. Find the sync task in the Sync history table and click the Details button to open the Task details page.
Click the Download button to download a CSV file of the data from that sync task.
Update or delete an existing connection
Select the integration you want to update at Settings > Integrations > Marketplace > Configured Integrations. Go to the Settings tab and update any necessary setting, click Save to confirm. If you need to delete or deactivate the connection, click on the Actions button. You will be presented with the option to either Deactivate or Delete the integration. Clicking either of them opens a confirmation dialog.
Assign promotions to a campaign
To add a promotion to a campaign, click on Add promotion in the Setup tab from the campaign builder.
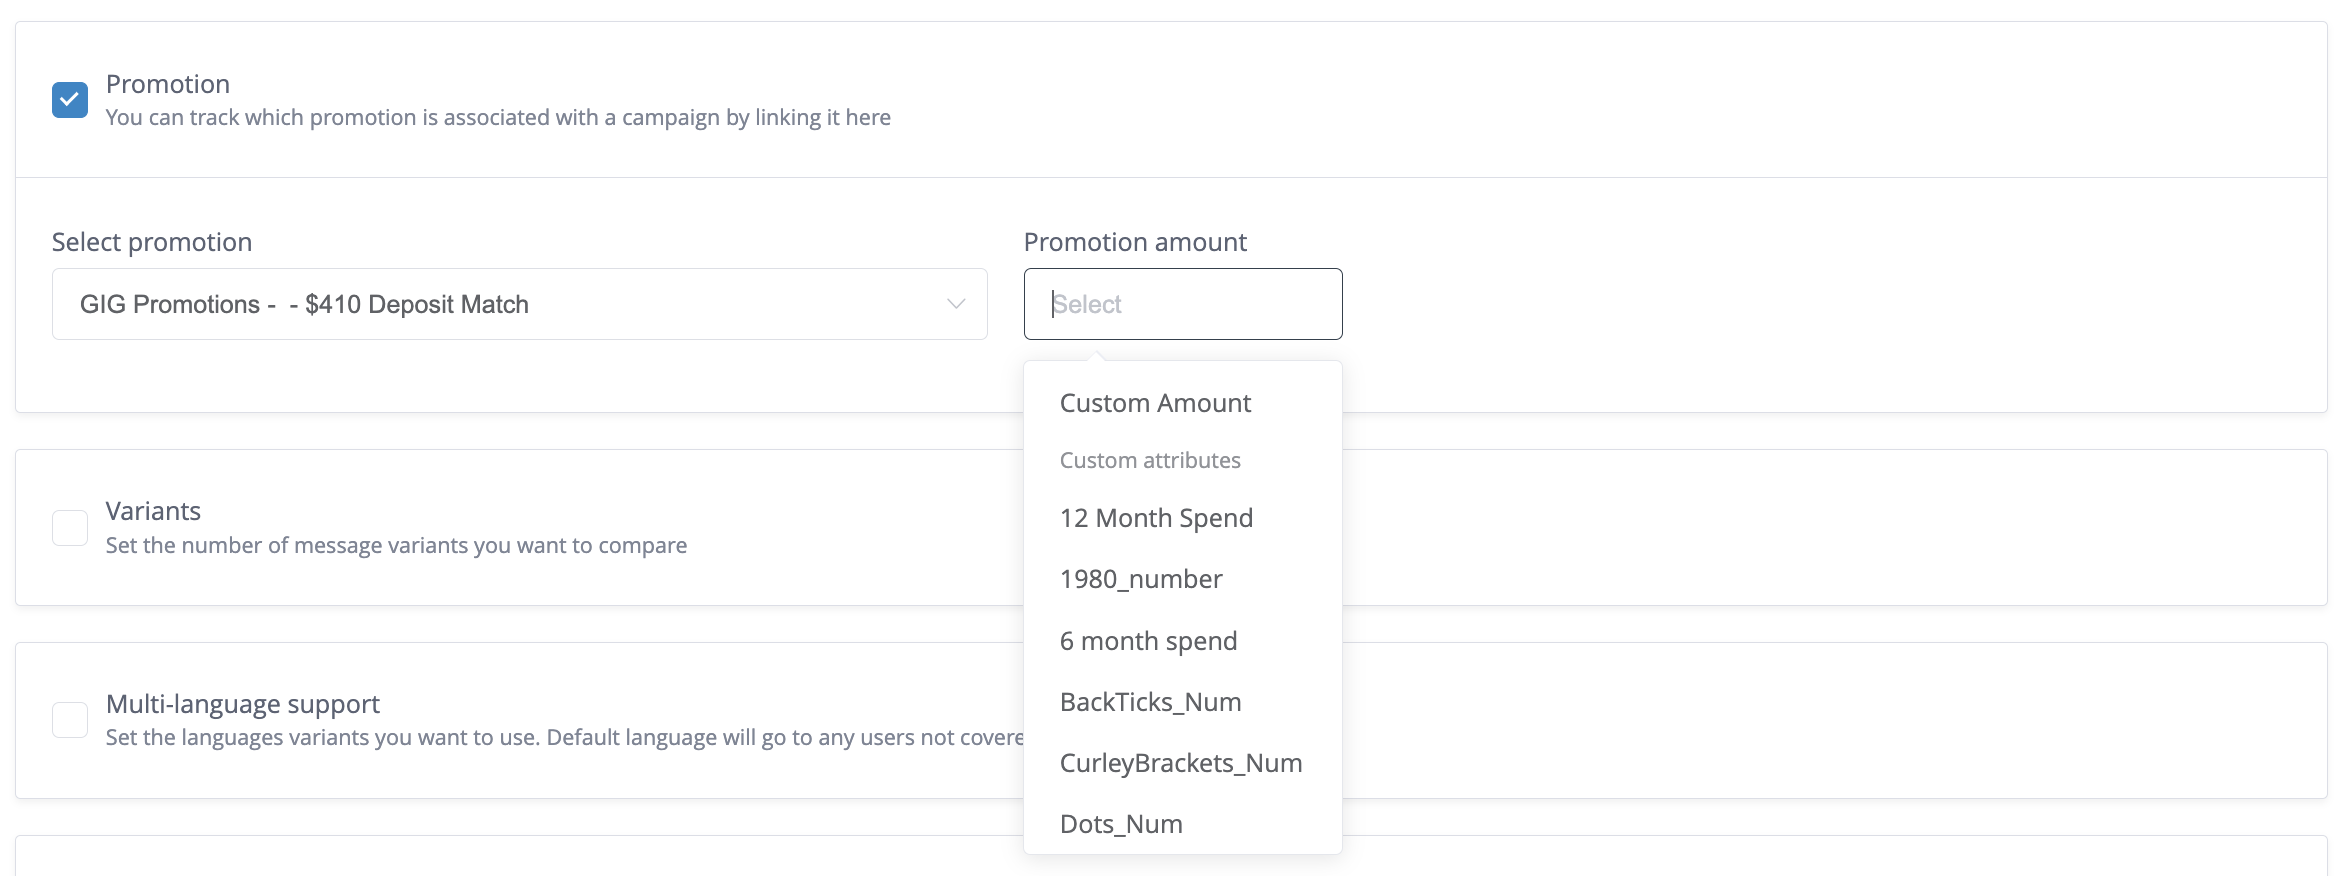
Search the list of available promotions (these need to be created beforehand in GIG) and select the desired one. Once you have selected the promotion, enter the desired promotion amount in the Promotion Amount field. For example, if the offer is for a €5 free bet then you would need to select Custom Amount and then simply enter 5 in the field.

Utilize values of custom attributes for the promotion amount
Additionally, on the Promotion amount dropdown, you can select a custom attribute to be used as the promotion amount value. For instance, you can choose attributes like the user's last deposit amount for this purpose.

The dropdown allows users to select custom attributes from the user profiles as the promotion amount value
When the campaign is sent, GIG is sent a list of all user IDs included in the send.
For more information on how to add promotion in single-stage and multi-stage campaigns, please read Bonus Engine Integrations Overview to learn more.
Using promotions for split test variants
To test the effectiveness of different promotions it's also possible to combine GIG promotions with split test variants. To do so click on Variants from the Setup tab of your campaign and assign the GIG promotion for each variant.

Updated 4 months ago