Mobile push quick start guide
All you need to know before starting to send push notifications through your mobile apps
Mobile push notifications are messages delivered to your end users through your mobile app where users don’t have to be in the app or using their devices to receive them. They are a powerful engagement tool meant to provide relevant and timely information to your subscribers. Android users automatically give consent to receive pushes when they download the app and iOS users will receive a prompt asking whether they want to receive notifications. If accepted, push notifications will be delivered to the end user.
Prerequisites: SDK integration
Mobile push notifications require you to configure your mobile applications in your Xtremepush project and that you complete the integration of the Xtremepush SDK. See details on how to achieve this in our dedicated guides for Android and iOS.
Make sure you are setting the user IDIt is recommended that at this stage you use our SDK method to set user IDs by following our dedicated guide to ensure devices can be associated and targeted in your campaigns by your own unique identifier.
Test mobile push notifications
Testing...Running tests is encouraged before start sending push campaigns to your customers. You'll find details on how to test below.
In order to test push you first need to opt-in to push for your apps. See detailed instructions below:
Android
Up until Android version 12, push notifications on Android were enabled by default and didn't require explicit opt-in from the user. Recently, Android changed its policy and now Android 13 will give users the ability to choose directly in the app if they want to enable push notifications or not.
For Android 13, in v9.1.0+ of the Xtremepush SDK, the opt-in prompt is off by default. This is to allow you to choose your own strategy for requesting notification access.
If you would like to show the opt-in prompt on app launch, you can enable this by adding the following to PushConnector.Builder:
.requestNotificationPermission(true)iOS
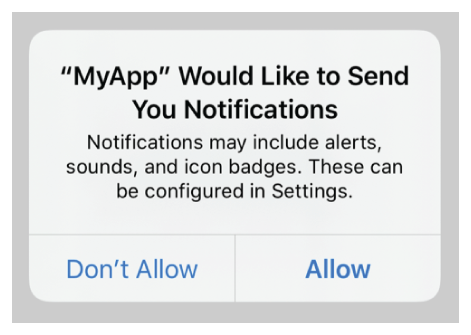
On iOS, the registerForRemoteNotificationTypes method used when initialising Xtremepush in your App Delegate will cause the push notifications system permissions dialog to appear:
XPush.register(forRemoteNotificationTypes: [.alert, .badge, .sound])[XPush registerForRemoteNotificationTypes:XPNotificationType_Alert | XPNotificationType_Sound | XPNotificationType_Badge];Once you do you will see this permission prompt will appear in your app:

Click on Allow to get your device subscribed to push notifications. You would be ready to test sending your device a test campaign. For more details on opting-in from your mobile app and best practices review our dedicated channel opt-ins guide.
Sending yourself a mobile push campaign
Once that you have configured your app, integrated the SDK and enabled push notifications for Android or/and iOS, you will be able to see Android / iOS push as available channels in the campaign builder page.
You can create a push campaign by navigating to Campaigns > Create Campaign > Single-stage > Time-based > Create campaign select Android Push or iOS push. Review our mobile push notifications creative guidelines for best results.
You can review more details about how to set up a mobile push campaign from our dedicated Android and iOS guides.
Navigate to the Segment tab to specify the recipients of the campaign. If you have integrated more than one app in your project you need to specify which one you want to target, otherwise, the push notification will be sent through all apps. If you want to target your own test device, you can do so by selecting identifier > device ID equals condition in the Segmentation Engine and entering your device ID.
How to obtain your device ID?Review our dedicated guide to learn how to obtain your device ID.
Count recipients before launching the campaignWhenever launching a campaign it is a best practice to use the Calculate recipients feature to count recipients and make sure that your targeted audience for this campaign is what you are expecting.
Troubleshooting
If you haven't received the push notification you can review some of the most common causes. First navigate to Campaigns > Existing campaigns and on the matching campaign click on the Options menu:fa-ellipsis-v: to see additional options > Notifications Log.
This page will show one entry for each application that you have targeted for that campaign. By clicking on Options:fa-ellipsis-v: > Details it is possible to drill down on the details of that campaign and check for any errors.
Troubleshooting: App debug logsYou can turn debug logs on your apps to review issues. See our dedicated guide for instructions on how to enable debug logs.
Updated 3 months ago