Import and create user profiles
User profiles can be created manually, which can be useful for quick tests during initial integration; however, larger lists can be uploaded directly, and the API can be used to keep user profiles in sync with your backend profiles automatically, also automated imports can be configured.
Manual entry
Navigate to Data > User Profiles and click the Create User Profile button.
All fields are optional; fill in the fields needed for the new profile. For example, if adding a profile for email, add the email address and set the email subscription to yes. Click the Create Profile button to save the new user profile.
SMS Mobile NumberMobile number for SMS must be added in the E.164 international format with the country code, without a plus (+) symbol.
Eg. An Ireland mobile number
0850123456should be entered with the353Ireland country code as353850123456.
A UK mobile number07400123456should be entered with the44UK country code as447400123456.
Import user profiles
You can also add test users or set up an initial list of users from a CSV file. The file needs to have a name for each column in the first row (or column header). A column for user_id is required. Custom Profile Attributes or system attributes can also be set. To do so, add more columns to the file; the attribute name should be the column header. Include the attribute values for each user.
There are a number of reserved field names that map to system attributes. These are listed in the Attributes guide.
Below is a sample CSV which demonstrates the system attributes, and includes a custom attribute called first_name:
user_id,email,email_subscription,mobile_number,sms_subscription,language,timezone,first_name
fe56bc676be78,[email protected],1,353850123456,1,en,Europe/Dublin,Sam
fe56bc676be79,[email protected],1,353850123457,1,en,Europe/London,Laura
CSV formatYour CSV file must follow the standard format, which most desktop software will do automatically.
If you need to configure your CSV format, fields should be separated by commas, and quoted using double-quotes when containing reserved characters. Technical details can be found in RFC 4180.
Files uploaded to Xtremepush must always be saved using UTF-8 encoding. This allows any extended characters such as those with accents to be correctly processed by the platform.
To import the file, go to Data > User Profiles and click the Import User Profiles button. This process has two steps to select the data source and to map the columns to attributes.
Data Source
After giving the import a name, choose the data source:
- The File Storage option allows users to import files from an SFTP site configured in Integrations marketplace, which is useful to run imports from a third-party platform. For more details about how to set this up please review our dedicated guide.
- Select Upload to choose a CSV from your computer.
Best practicesFollow these recommendations to avoid common issues when importing user profiles:
- Trim leading and trailing spaces from field values.
- Avoid blank values, unless specifically trying to remove existing values when updating existing profiles.
- Use consistent casing for identifiers (such as email or user ID). For example, if user profiles have been created as
user123, subsequent imports used to update users must continue usinguser123and not a different casing such asUser123orUSER123.- Maximum recommended size is 10MB.
Data Mapping
Once you have imported the file from either data source, click on Next Step to map the data.
If the CSV headers exactly match the attribute names, the data for the user profiles will be mapped to fields automatically. Otherwise, users can choose to not import the data for that column altogether (this option is selected by default (Don't import)) or map the data to the desired field by selecting it from a drop-down menu.
Available attributesIt is only possible to select existing attributes in the project, so make sure to create any desired profile attributes before importing user profiles.
Once you have completed mapping the columns of the CSV file, click on Run import to complete it.
Automated imports
A regular import of user profiles from a third-party platform can be set up using Automated imports.
Via API
To keep user profiles in sync with your own backend system, we recommend using the API.
The API method for importing user profiles can be found in the User Profile Import API reference.
You can find general information on the Xtremepush APIs in the External API Overview.
Concurrent importsTo prevent issues, make sure that you stagger automations by 5 minutes if you are going to import more than one file that includes the same user profiles.
Review import status
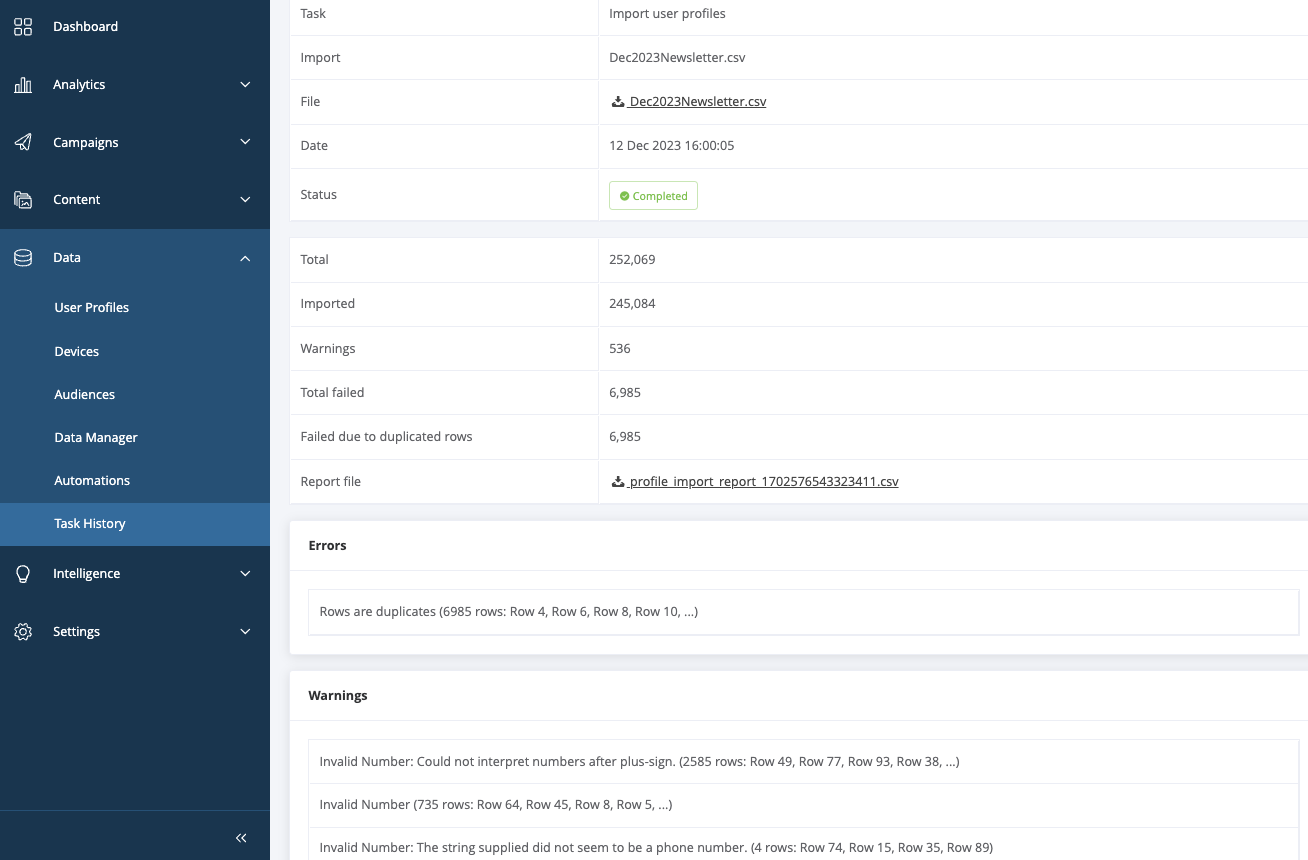
The status of User Profile imports can be tracked by reviewing the Task History. This is available for manual, automated or asynchronous API imports, and shows up as Import user profiles task. Click on the Options:fa-ellipsis-v: menu on the right of each task to review the details
Task import details
The task import details page provides an overview of the import:
- Total: the total number of rows being imported
- Imported: the number of rows that have been imported successfully.
- Warnings : rows that have been imported with a warning
- Total failed: the number of rows that failed to import due to an error
- Failed due to duplicated rows: rows that did not import due to a row with the same data already existing in the imported file. The first row is imported and subsequent ones are ignored.
This page also shows an overview of the errors and warnings seen on this import.

The report file has a detailed breakdown of all the users that have been imported along with the details for users who had a warning or failed to import, and due to which error.
Updated 4 months ago