Segmentation
Divide your audience into subsets, in order to target specific users
Using segments, you can create targeted campaigns for specific user profiles that share the same identifiers.
As well as your own attributes & tags, there are many data points that Xtremepush provides from a basic SDK integration with your apps and sites. For example:
- App open history, such as highly engaged users who have opened the app more than 30 times in 5 days
- When the app was last opened for re-engagement campaigns by segmenting users who haven't opened the app for 20 days or more
- Which country the device is registered
- The language set for the device
Days vs calendar daysThere are two options in the segmentation engine around days.
- 1 day means 24 hours either side of a given date/time. For example, in next day means any time in the next 24 hours.
- 1 calendar day looks at full days either way. For example, in next 1 calendar day would check any time tomorrow.
Creating segments
There are two ways to create segments in the platform.
-
From the campaign builder, by using the Segment tab, where you can create single-use segments or use any existing segments for that campaign.
-
By navigating to the Data > Audiences > Segments section and clicking on Create Segment, which allows you to create reusable segments.
The segmentation engine
To create a segment, you need to give it a name, set the required rules and save it so it can be reused. You can also evaluate user statistics based on the segment.
Navigate to Data > Audiences > Segments and click the Create Segment button.
Enter the segment name.

In order to build the segment, one or more rules can be applied. When using more than one rule, their relationship is described by choosing either AND / OR as boolean functions.
When AND is selected, all the rules set within the section must be met for a user to receive that campaign. The example above shows a segment with rules that target users whose last purchase is in the last 5 days and who are subscribed for email.
When OR is selected, any user profiles that meet any of the rules will be targeted. If OR had been selected in the example above, this segment would target users whose last purchase was in the last 5 days or who are subscribed for email campaigns.
In a similar manner, rules can be grouped into sections, allowing for more complex targeting. To add a new section and create rules within that, click the Add New Section button.
All rules within a section are related to each other and give a target audience outcome. Sections are then related to each other using another AND/OR function. To extend our example above, a section can be added to also include users that have purchased more than 10 times and the last time being in the last 30 days in the segment.

The two sections are joined using the Or option, meaning that users who meet all the conditions set in either section will be targeted. If the sections were related using the And option, then the user would have to satisfy all the conditions in both sections.
Once you have added the relevant criteria to your segment, click Save.
Available data for segment rules
Open the Select Type drop list to see a list of available data, grouped into categories.
It is possible to create segment rules based on:
- User info
- Device Info
- Engagement
- App Usage
- Location
- Identifiers
- Attribution
- Applications
- Segments
Review some common use cases in our dedicated guide.
Each category contains a number of available pieces of data, for example, subscription status or activity and includes user profile data that you have added to your data set. More detail on using each category is available in the linked pages above.
When you select the data type, the choices available for testing that data are presented. For example, selecting the Device Info category then the OS Name data presents a drop list of OS names for you to select from.
Evaluate user statistics
After adding the desired rules you can perform evaluations on the segment by clicking the Evaluate drop list. Choose from:
-
Count users, which returns the number of your targeted audience along with their associated devices.
-
Count devices, which returns the number of devices in your targeted audience.
-
Count channels, which returns the number of your audience for each comms channel available. When using this option, it's possible to factor in a specific engagement category, and also whether the users in the segment are subscribed or suppressed by the global include condition or suppression lists existing in the project.
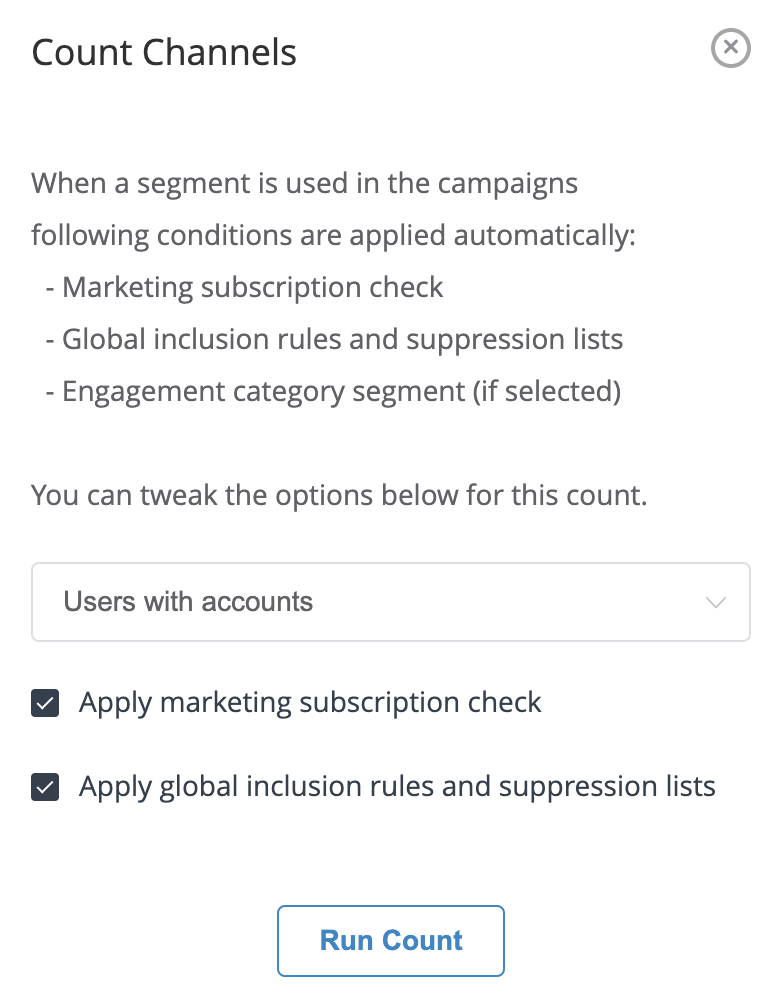
In this example, a channel count of a segment that considers the engagement category Users with accounts and whether users are subscribed or suppressed is shown.
-
Preview users, which displays the first 25 user profiles in your segment
-
Export users, which allows you to download user profiles or devices in your segment. The user profile export option allows you to include all the system and custom profile attributes in the CSV export file. Click on the attribute name to include it or select All attributes to include all of them in your export.
Review, copy and delete a segment
From Data > Audiences > Segments users can see all the saved segments for that project. By selecting the Options menu:fa-ellipsis-v: on the right of each segment it is possible to:
- Edit: make changes to an existing segment or perform evaluations
- Copy an existing segment
- Delete the segment
- Export users (as described before)
Updated 7 months ago