Bracket Predictor
An overview of the Bracket Predictor game, including its key features, configuration, and campaign setup process.
Updated User InterfaceThe Bracket Predictor game has an updated UI. The layout and design of the game's backend differ from other games offered by Xtremepush.
Game Overview
In the Bracket Predictor game, players predict the outcome of a sports tournament to win prizes. Players win points for correct predictions and you configure how these points convert into prizes.
In the game, players submit all predictions in a single round before the tournament begins. They must complete the entire bracket by selecting winners for every stage until they predict the final winner.
For example, the image below shows a tournament of 64 games. In this example, the players first select the teams they predict will win the initial 32 matches as highlighted in red.
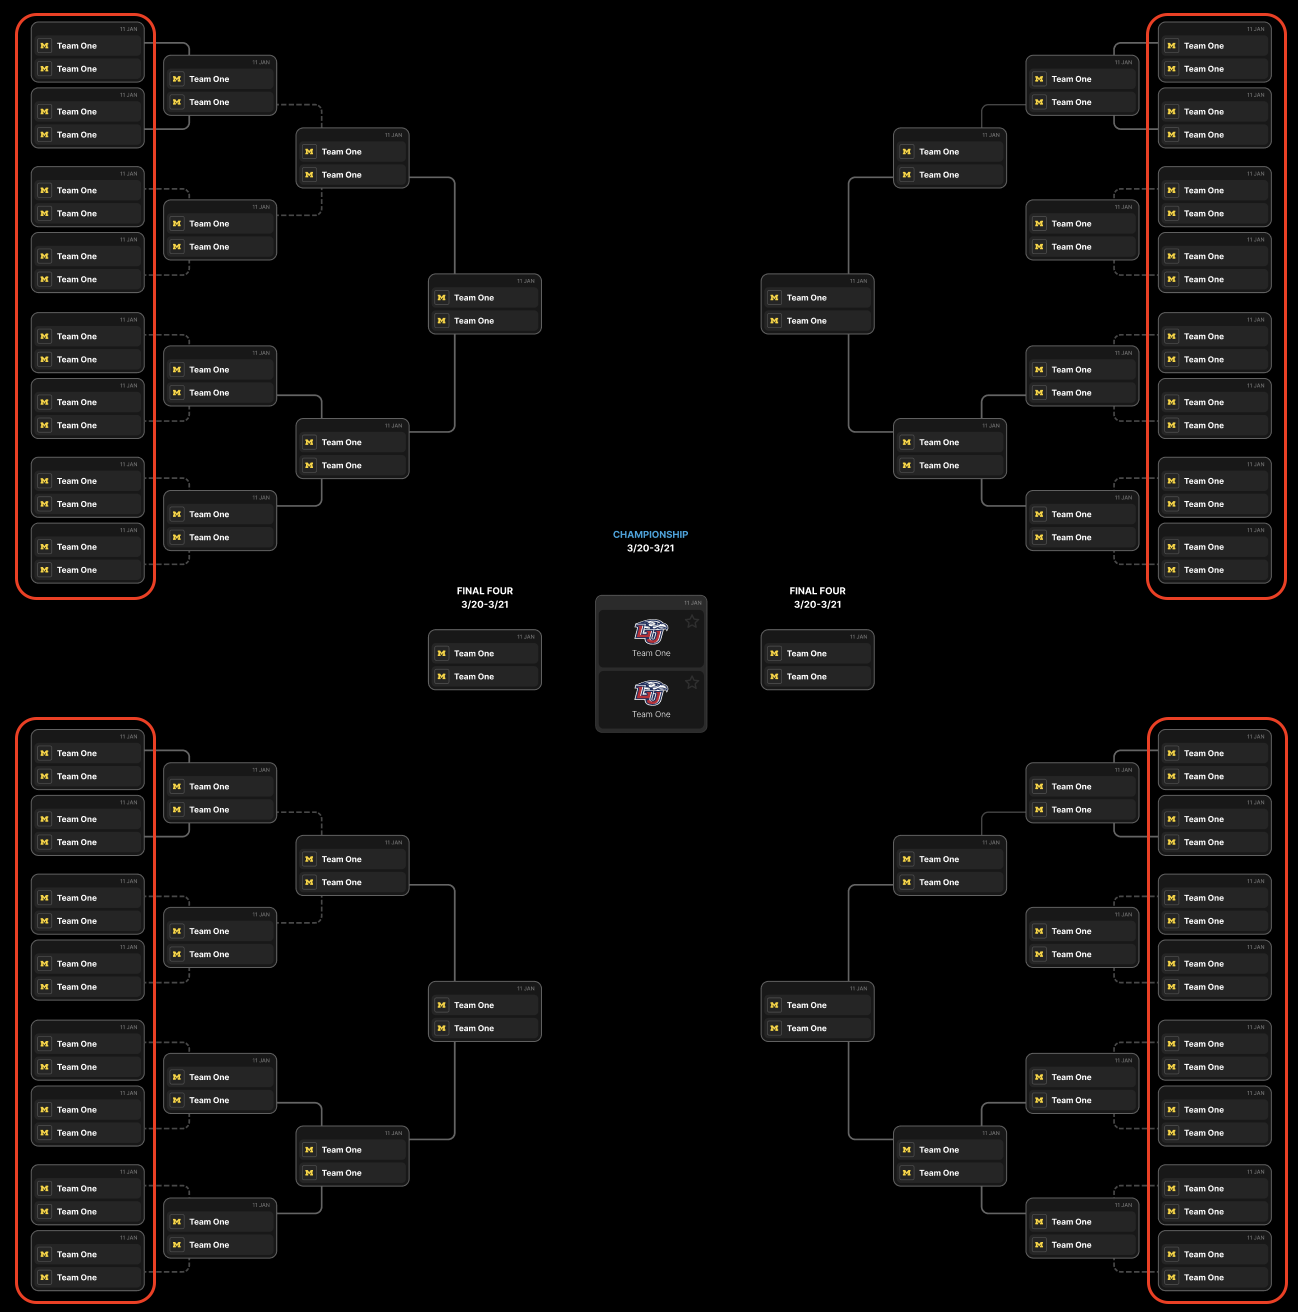
A example 64-team tournament bracket. The highlighted first-round matches show where players make their inital predictions
Following their 32 predictions, the teams selected by the players automatically advance to the next stage in the bracket. Players continue to select winners for each subsequent round until they predict the final tournament winner.
You configure a cutoff time for when player selections and new entries to the game close. After the cutoff, the players wait until the tournament ends to track their progress as the real tournament progresses. The example below shows a player tracking their winning prediction.
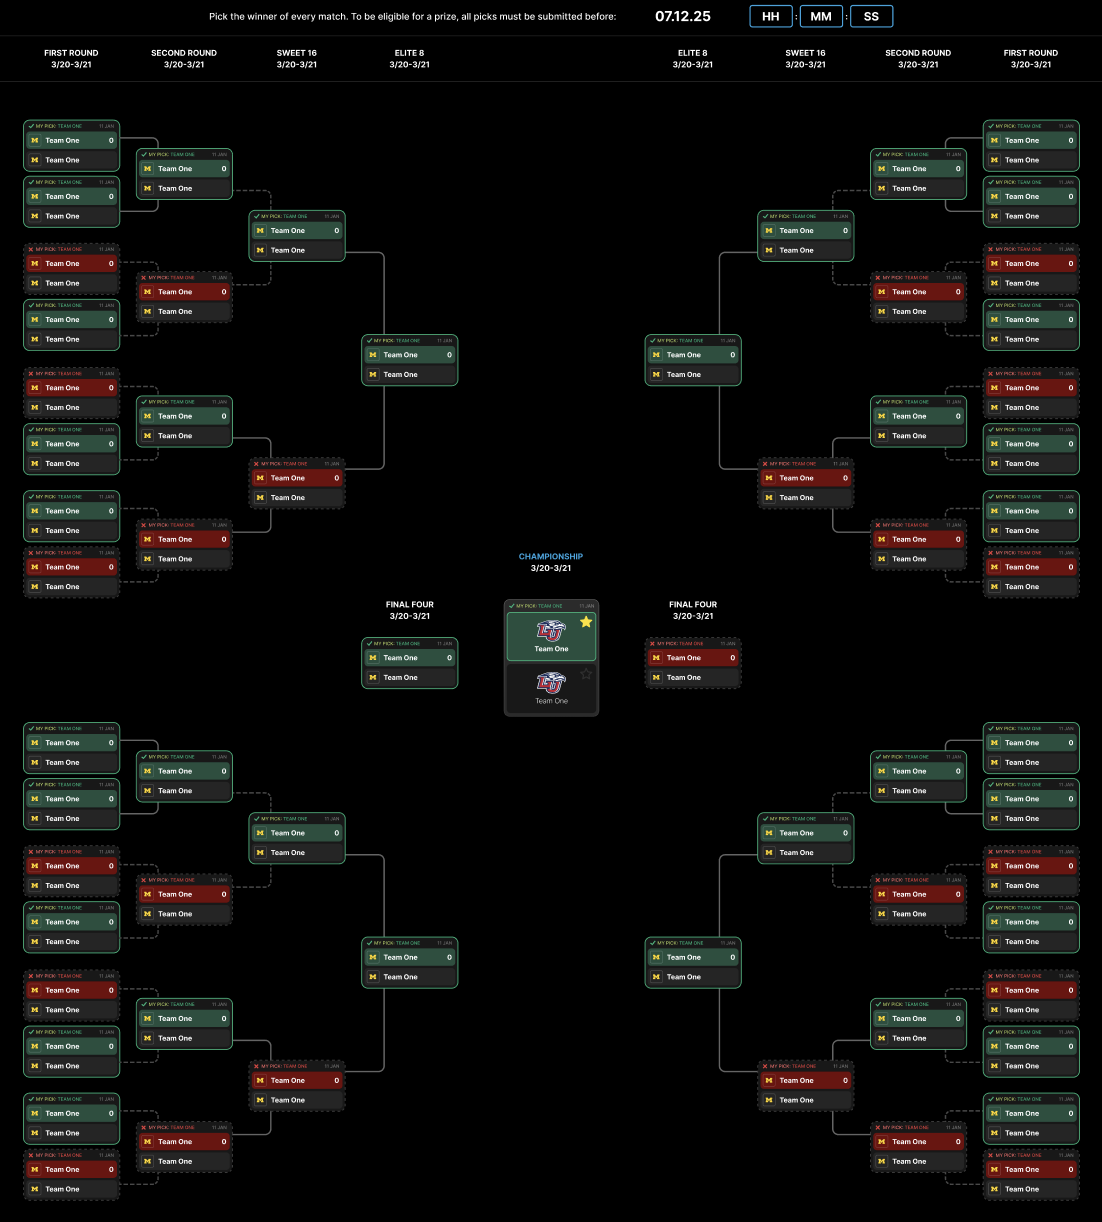
A example of player's view of the bracket, used to track the progress of their picks as the tournament unfolds.
Players earn points when their selected team wins a match and advances to the next stage. This applies even if the team faces a different opponent than originally predicted. If a selected team is eliminated from the tournament, the player stops earning points for that selection.
For example, a game where Team A plays Team B and Team C plays Team D. A player predicts that Team A and Team C will win their matches. The player also predicts Team A will win the subsequent bracket against Team C. In the real tournament, if Team A wins but Team C loses, the player receives points for Team A only. In the next bracket, Team A faces Team D. Since the player predicted Team A to win that stage, they receive points if Team A beats Team D.
The game is supported on mobile devices. The images below show the mobile interface for both the selection phase and the progress tracking phase.
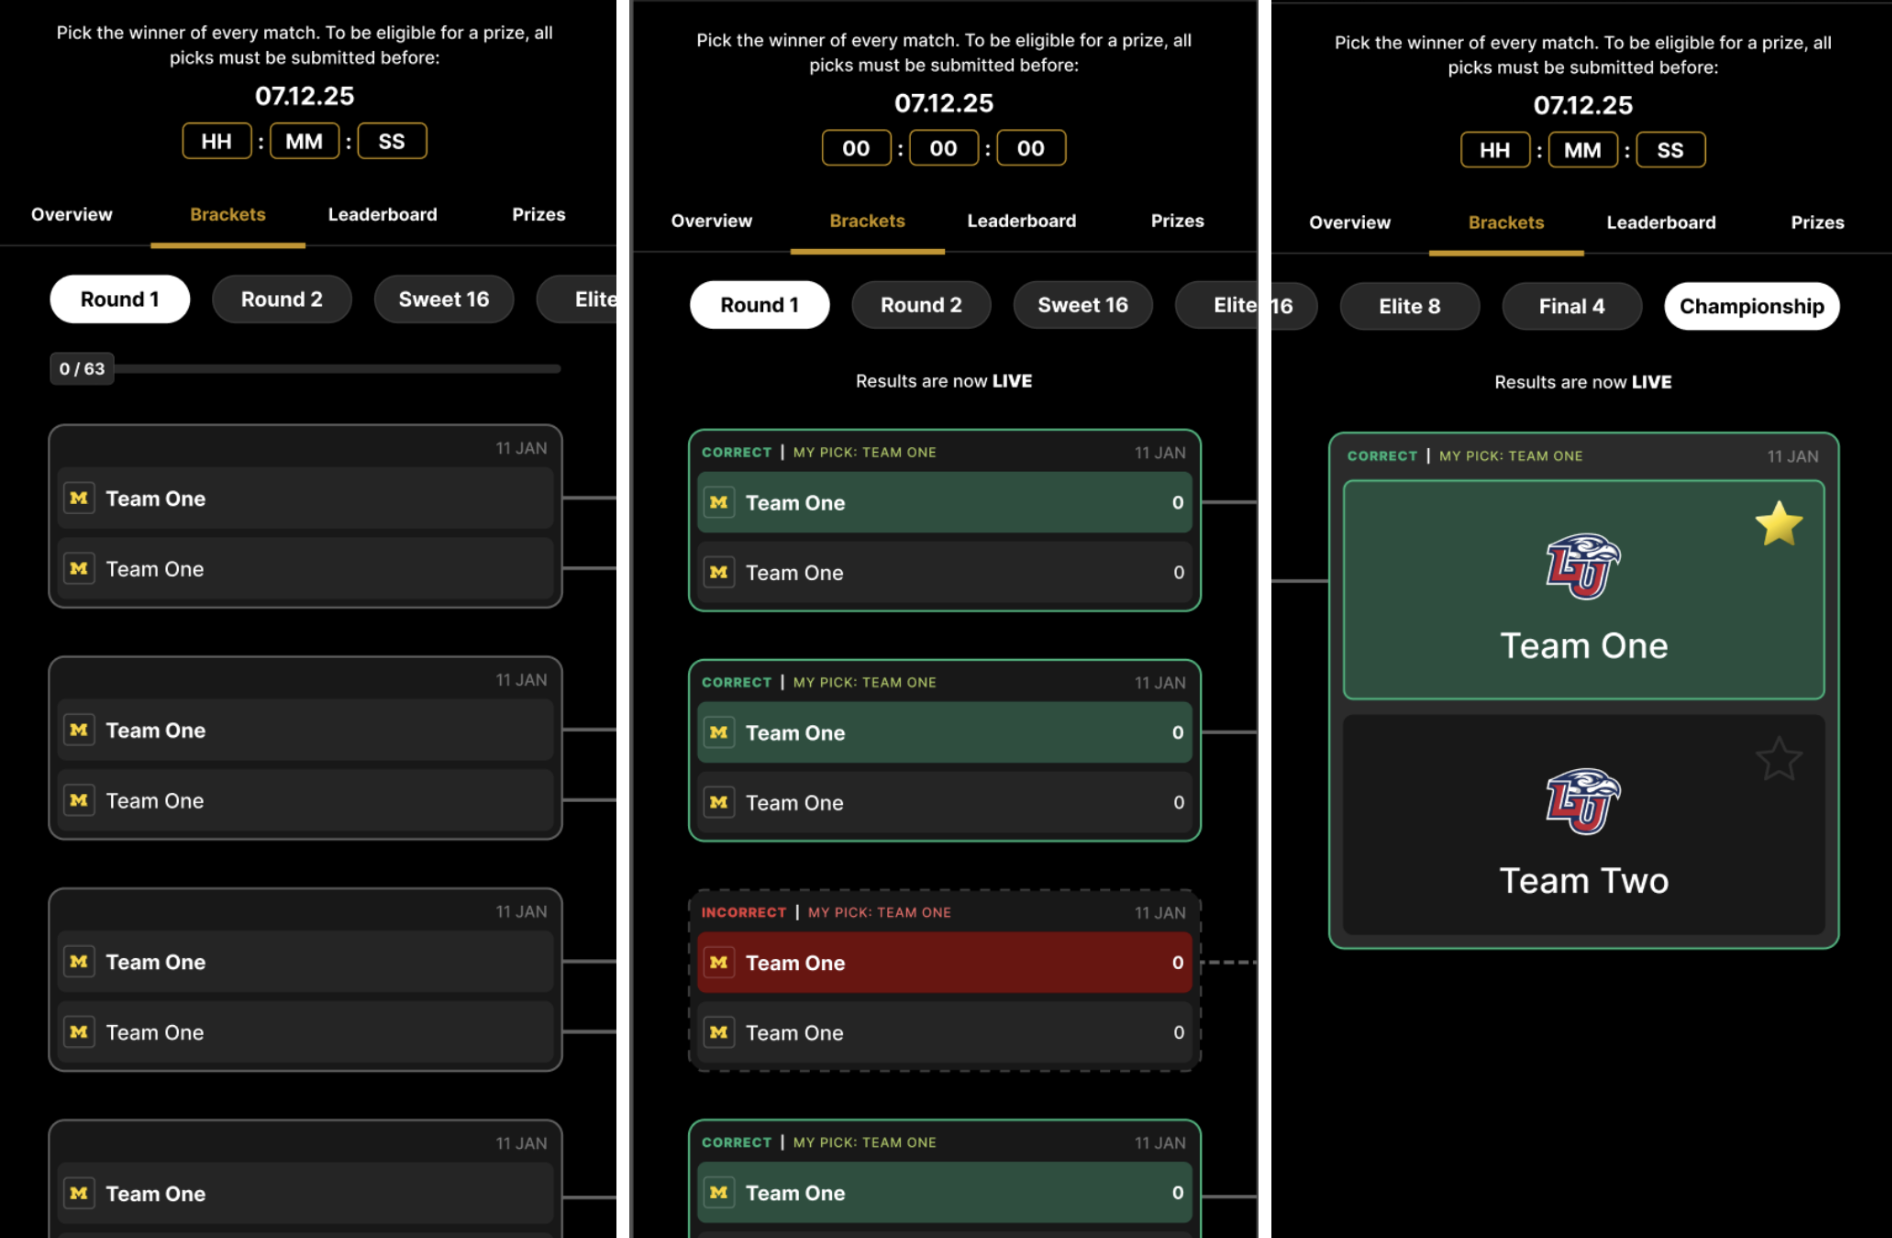
The mobile view of the game, showing both the player selection and bracket tracking screens
The entire game is built and managed within the Xtremepush platform. A URL is generated when a game campaign is created, which can be embedded directly on your website.
Prizes
- Prizes can be awarded to your players when they accumulate a specific points total or if they achieve a specific leaderboard rank.
- Prize configuration involves specifying customer segments. This determines which players are eligible to play the game and win prizes.
- Each prize can be linked to a specific promotion from your bonus engine integration.
Scoring Logic
Points are awarded when a selected team progresses through the bracket. The available scoring logic configuration options depend on whether the prizes are based on leaderboards or points.
- Standard Scoring: Awards a fixed number of points for every match won by a selected team. This option is available for both points and leaderboard based prizes.
- Advancement Weighted: Awards an increasing number of points when the selected teams win in later stages of the tournament. For example, a win in the final by a team is worth more than a win in the quarter-final. This option is available for leaderboard based prizes only.
Game Design
The screenshots in the Game Overview section are examples of how the game can appear. You can customise the game's front-end as per your requirement.
To do so, first send a Figma file of your designs to Xtremepush. We will use this to create assets that form the layout of the game's, which you then upload when configuring the game campaign. To get you started, we can provide a standard Figma file of the game design.
Analytics and Tracking
See Monitor Player Activity and Fixtures below for more information on the player and fixture details recorded in Xtremepush for this game.
Prerequisites of Game Setup
- Send your Figma file of your designs to your account manager at Xtremepush. We will use this to create the general layout of your game.
- Raise a support ticket to request the competitions you want to include in your game. See Contact Us for information on contacting support.
- To target your game to specific players, you'll need pre-configured segments. These must be created on the Xtremepush platform before you start. For more information, see Before You Create a Game Campaign.
Setup Process
Creating a game campaign involves completing the following five steps. The image below shows the overview of the game setup and launch process:
Campaign Setup
Configure basic details and select the competition.
Game Rules
Set round duration and configure scoring.
Content & Assets
Configure frontend text and upload assets.
Prizes
Configure prizes for the game.
Preview & Launch
Review details, generate URL, and embed.
Monitor Game
Monitor player activity and fixtures.
You must complete each one before moving to the next.
- Campaign Setup:
- Configure the basic details of the campaign, such as its name, the customer segments that can play, start and end dates, and more.
- Select the competition and teams that will appear in your game.
- Game Rules:
- Configure the round duration.
- Configure the scoring system for the round.
- Content and Assets:
- Configure the text that appears in the game's front end.
- Upload the assets that form the front-end of the game.
- Prizes: Configure the prizes, including the eligible customer segment and the associated promotion.
- Preview and Launch: Review all the game details and confirm your changes. This generates the game URL, which you can then embed as an iframe on your website.
After you launch your game, you can view the player activity and fixtures in the Game Overview tab of your game campaign.
To get started, go to the Campaigns tab, click Create Campaign, and follow the steps detailed in the sections below.
Campaign Setup
In the Campaign Setup tab, configure the Basic Setup details and select the Competition and Teams for your game.
In the Basic Setup tab, provide the following:
- Name: Give your campaign a unique and descriptive name. This name will be included in your game’s custom URL which you will embed in your website.
- Start date and End date: Define the period during which your game campaign is active. These dates control campaign availability, not when predictions lock, that is configured separately via the Lock Time field in the Game Rules tab.
- Start date: When the game becomes accessible to players. Before this point anyone who visits the game will see a "Campaign not started" message.
- End date: When the campaign closes entirely. Players visiting after this point will see a "Campaign ended" message.
- End Campaign after last round: Turn on this toggle to automatically end the campaign a specific number of days after the last round. The End date option is hidden when this toggle is enabled.
- Time zone: Select the timezone of your target audience. This timezone will apply to all campaign elements such as prizes and time slots.
- Exclude Segment: If required, select a segment that you want to exclude from participating in the game such as bonus abusers. Users in this segment won't be able to access the game.
- Default Segment: Set a default segment to ensure any user who doesn’t match your pre-defined segments can still play the game and receive a prize.
Default SegmentIn the Default Segment field, select one of your previously created user segments. Any participant who does not belong to another segment in your campaign will be treated as part of this default group. They will receive the prize that you configure for this segment.
For example, if you have two user segments VIP and New User and you intend to give the New User segment the lowest-value prize. Then, if you choose New User as the default segment, then any player not in VIP and New User segments can:
- Participate in the game
- Be awarded the same lowest-value prize as the New User segment
In the Competition and Teams tab, provide the following. The data for these fields comes from the Xtremepush data feed.
- Choose Sport: Select the sport for the tournament.
- Country: Select the country where the competition takes place.
- Competition: Select the competition. For example, Premier League.
When you select the competition, the teams for that competition are displayed. These are the teams that are shown to your players. Your players will make predictions for the matches between these teams.
Competition Details will be LockedThe Competition you select on this page is locked in after you save and move to the next tab. Ensure this information is correct before you save and continue to the Games Rules tab.
You cannot return to this page to make changes after proceeding. If you need to edit the competition details, you must create a new campaign.
Game Rules
In the Game Rules tab, you set up the round's duration and its scoring system.
Configure Round
A round defines the complete timeframe of the game. This includes the time when players can make their predictions to when fixtures end in the tournament. For example, you can configure a round to start two weeks before the tournament begins to allow time for entries, and set it to end on the day of the final match.
The Bracket Predictor game consists of a single round where players make all their selections once at the start of the tournament.
In the Rounds section, provide the following:
-
Name: Enter an internal name for the round. This name is internal only and the text displayed to players for the round is configured later in the Content and Assets tab.
-
Start & end date: Define the full duration of the round. These dates are pre-populated to align with the campaign start and end dates.
The Start date is when the game becomes available to players to make picks. The End date is when the game concludes and final results are displayed.
-
Lock Time: The last date and time when users can make their picks. After this point:
- New players cannot participate.
- Existing players can access the game to view results and track the progress of their predictions.
After you save your round details, click Save and Continue to scoring.
Fixed Configuration FieldsThe following fields are fixed for the Bracket Predictor game and cannot be changed:
- No. of Rounds- This value is automatically set to 1 since the Bracket Predictor game only consists of one round.
- Prediction type - This is fixed to Team Advancement.
- No. of selections - The number of selections a user must make. This value is automatically calculated based on the competition selected in the Campaign Setup tab. For example, a 64-team tournament would have 32 selections.
Configure Scoring
In the Scoring section, you configure how points are awarded to your players.
Fixed Resolution MethodThe Resolution Method is fixed to Point Accumulation for the game. This means the game outcome is calculated based on the total points a player accumulates. These points determine both leaderboard rankings and eligibility for point-based prizes.
Leaderboard scoring
If you want to display a public leaderboard in your game, turn on the Enable Leaderboard toggle. When enabled, players can view their position relative to all game participants as shown in the example image below.
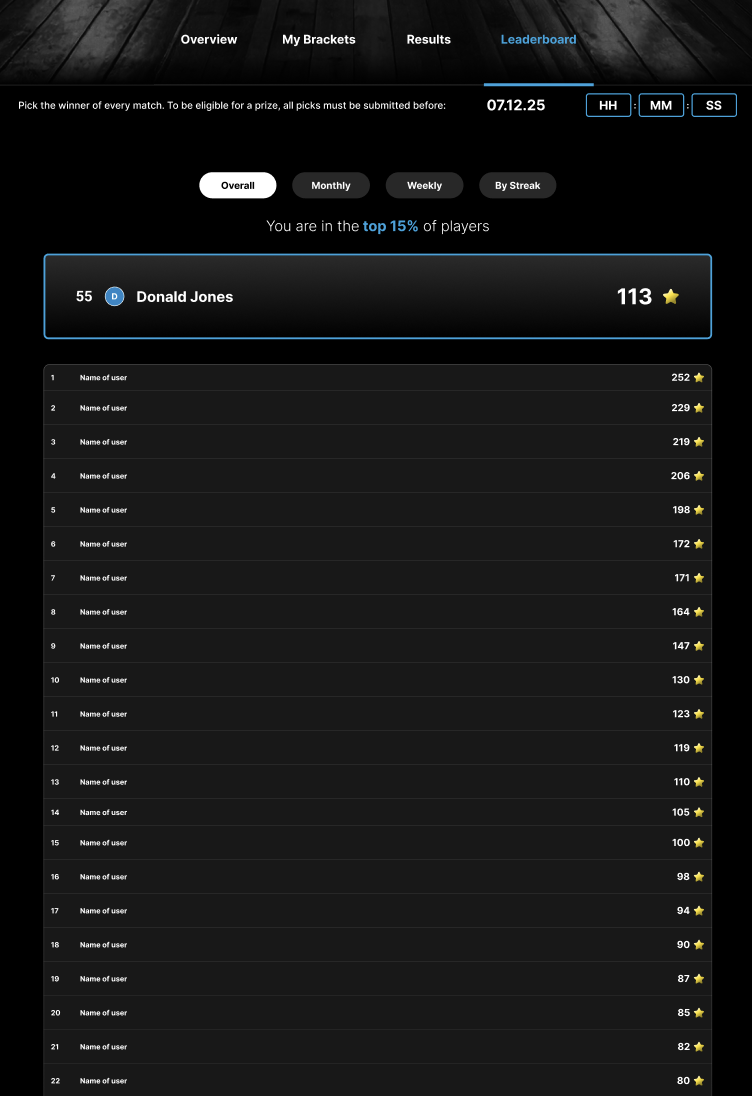
Example of how a leaderboard is displayed to a user
In this configuration, prizes are awarded based on a player's final position on the leaderboard.
If you enable the leaderboard toggle, configure the following:
- Points Logic: Define how the points awarded for specific match outcomes:
- Standard Scoring: Awards the same, fixed number of points for every match won by a team your player picked.
- Advancement Weighted: Awards an increasing number of points when your chosen teams win in later stages of the tournament. For example, a win in the final by a team you picked is worth more than a win in the quarter-final.
- Tiebreaker question: Enter the question used to resolve tied scores. This field is mandatory when the leaderboard is enabled. To receive a prize, tied players must answer this question correctly.
Configuring the Tiebreaker AnswerYou must configure the tiebreaker question during the campaign setup. However, you can only configure the answer for the question after the campaign is live.
The tie-breaker answer must be a numerical value
Points-based scoring
If your game uses a points-based system, you can award prizes based on the total number of points a player accumulates. If you use the point-based scoring, configure the following:
- Points Logic: Define how the points awarded for specific match outcomes. Standard Scoring is the only available option. This awards a fixed number of points for every match won by a selected team.
Content and Assets
After creating the campaign, the next step is to set up the front end of your game. This process involves the following in the Content and Assets tab:
- Configure the texts that appear in your game
- Uploading the assets that form the front-end of your game
Configure Game Texts
In the Content tab, you can configure the texts that appear in the game.
Exception Messages
The Exceptions section lists the scenario-specific messages displayed to your players, such as Please Log in and Player not Eligible. The table below details the specific conditions that trigger each message.
Message | Trigger Condition |
|---|---|
Please login | Player trying to access the game is not logged in to their account or JWT token has expired |
Player not eligible | The player is not in the specified user segment for the game OR The player is in the game’s excluded user segment |
Prize not found | The player does not belong to a user segment eligible to win prizes. |
Bracket not found | Displayed due to incorrect bracket configuration. Contact Xtremepush support to resolve the issue. |
Campaign not available | The player attempts to access the game campaign outside of its active time slot. OR The player attempts to access the game too many times in a short period (potential hack attempt) OR The player attempts to access a question that’s not live anymore or is invalid |
Campaign not started | The campaign’s scheduled start date is in the future |
Campaign ended | The campaign’s scheduled end date has passed |
Game Expired | The game is no longer available as the campaign end date has passed |
Already Predicted | The player tries to make a prediction after the round Lock Time has passed. |
Already claimed | The player has already claimed the prize. |
Some Parameters Missing | Required parameters are missing from the game URL OR The player's authentication token (JWT) is missing or invalid. |
Invalid Game | A general error occurred. This issue can arise from various reasons. Contact Xtremepush support to resolve the issue. |
Frontend texts
The fields in the Frontend section contain the text displayed on the game's UI. This text matches the content in your design or Figma file.
Enter the text for each field in the Frontend section. If required, refer to your Figma file to identify where these texts appear within the game.
Upload Game Assets
Next, upload the game assets in the Assets section, which is divided into the following categories:
- Teams: Upload the images for the teams in the competition.
- Games: Upload general game assets like, icons, backgrounds, and other images.
- Fonts: Upload the font style for the text displayed in the game.
The game currently doesn't support sounds or animations.
Supported Asset Types
The allowed file formats for each asset type:
- Fonts:
.woff(Recommended)- Other supported formats:
woff2,otf,andttf
- Other supported formats:
- Images:
.jpg/.png.
Configure Prizes
Prizes in Bracket Predictor
In the Prizes tab, you configure the prizes for your game. Based on the scoring configuration you made earlier, your can base your prize configuration on either:
- Players reaching specific point thresholds, such as 100-200 points or 150 points. In this example configuration, players receive a prize based on the total points they accumulate at the end of the tournament.
| Prize | Points |
|---|---|
| 20 Free Spins | 50 |
| $10 Free Bet | 150 |
| $50 Cash Bonus | 250 |
- Players reaching a specific rank, such as rank 25-50 or rank 5. In this example configuration, players receive prizes based on their final ranking at the end of the tournament.
| Prize | Leaderboard Rank |
|---|---|
| 20 Free Spins | 70-100 |
| 50 Free Spins | 40-69 |
| $20 Free Bet | 10-25 |
| $50 Free bet | 2-10 |
| Grand Prize | 1 |
You can optionally associate a prize with a promotion from the bonus engine. When your player wins a prize, Xtremepush sends a request to the bonus engine to automatically award the linked promotion to that user.
Segmentation allows you to define which players are eligible to play the game and win specific prizes. You can assign multiple customer segments to a single prize configuration.
This allows you to offer the same prize structure to different groups without creating duplicate entries. For example, if you want to offer the same prize to four different customer segments you can select all four segments within a single prize entry.
Configure a Prize
In the Prizes tab, provide the following:
- Name: Give the prize a unique and descriptive name. This is the internal name of the prize.
- Segment: Select one or more customer segments the prize is applicable to.
- Start and End date: Define the window during which the prize is awarded. Set the Start date to match your campaign or round start date. Set the End date to match your campaign or round end date. This is to ensure your prizes are available during the campaign or round.
- Promotion: Select the specific promotion from your bonus engine integration. When a user qualifies for the prize, it triggers a request to the bonus engine to apply the specified promotion to the user's account.
- Criteria to win the prize
- Leaderboard rank: This field appears only if you enabled the leaderboard. Enter the exact rank or rank range required to win.
- Points: This field appears only if you use points-based scoring. Enter the exact point value or point range required to win the prize.
Preview and Launch
In the Preview and Launch tab, review the details of your campaign, select the confirmation checkbox and then click Launch Campaign to generate a URL for your game.
This generates the game URL, which you must embed on your website. The game becomes active based on the Start date you configured in the Setup tab.
For information on the game URL structure and how to identify users using tokens, see Launch your Game and JWT Authentication Details.
Manage Existing Campaigns
You can access all campaigns in the Campaigns tab. The status column indicates the current state of the game:
- Draft: The campaign is saved but not yet launched.
- Launched: The campaign has been launched but the start date has not yet passed. When the start date passes, a Live label appears next to this status to indicate that the game is currently active.
For launched campaigns, you can edit most campaign details. However, the Competition details selected during setup are locked and cannot be changed. If you are not ready to launch immediately, you can save the campaign as a draft and finish it later.
Deleting CampaignsYou can delete campaigns if they are no longer needed. However, once a campaign is deleted, it cannot be recovered. To end a campaign without deleting it, change its end date to a time that has already passed
You can also view the history of changes or export campaign data using the View Audit Log and Download Data buttons. These options are available in all four configuration tabs.
Monitor Player Activity and Fixtures
After your game campaign is created and embedded on your website, go to the Game Overview tab in the campaign. This tab shows the player activity and the fixture details.
Monitor Player Activity
In the Play History tabs, you can see all the players that have played the game and following details of each player:
- Customer ID: The unique identifier of the player.
- Winning prediction: The name of the team the player selected to win the tournament.
- First Entry Time: The date and time the player made their first prediction.
- Total Points: The total points accumulated by the player.
- Prize: The prize awarded to the player, if any.
- Processed At: The timestamp indicating when the round was processed. This confirms that the round has been successfully processed. Prizes are assigned only after rounds are processed. Since the round closes simultaneously for all users, this timestamp is identical for every player.
Monitor Fixtures
The Fixtures tab displays all past, current, and future matches in the tournament. It provides the following details for each event:
- Home Team Name and Home Team Score
- Away Team Name and Away Team Score
- Kickoff: The scheduled date and time of the event.
Overriding Live FixturesYou can manually override the score and result of a match. This is useful in scenarios where an event is cancelled or if there are issues with the data feed.
To override a result, go to the Fixtures tab and turn on the Override result toggle. You can then manually select the winner or adjust the scores.
Updated 25 days ago